Autoware Installation on the RoboRacer
Jetson Xavier NX and RoboRacer Recordreplay Demo
This tutorial provides step-by-step instructions for installing and setting up the Autoware development environment on the RoboRacer race car. The Autoware installation process in this branch is modified from the main one to adapt to the Jetson Xavier NX hardware and software systems. One major difference of this Autoware environment is that it runs on ROS2 galactic instead of ROS2 humble due to the fact that the NVIDIA Jetson currently only supports Ubuntu 20.04 or below. To natively build and run autoware without using docker, galactic is used to increase system compatibility. The original Autoware installation documentation from main branch, and the RoboRacer build documentation (running ROS2 foxy) are here for your reference.
This repo also includes a RoboRacer Recordreplay demo. This demo allows the user to first build a map, record a trajectory by manually driving the RoboRacer race car, and then perform trajectory following in both the RoboRacer gym simulator and in `real-world`(testing in progress) running the Autoware framework. Instructions for installing the RoboRacer gym simulator are provided. The approximate time investment is based on running Jetson Xavier NX on 20W 6core power mode.
Flash JetPack 5.1.1 (rev. 1) to Jetson Xavier NX
(Approximate Time Investment: 1-1.5 hours)
There are multiple ways to install JetPack on a Jetson as described in Jetpack 5.1.1 Documentation. The recommended ways to install are via the NVIDIA SDK Manager Method or the SD Card Image Method. This repo was tested on JetPack 5.1.1. Other JetPack versions may also work but have not yet been tested.
NVIDIA SDK Manager Method:
This method requires a Linux host computer running Ubuntu Linux x64 version 18.04 or 20.04 with ~40GB of disk space
This method you will first install NVIDIA SDK Manager on your host machine, connect the host machine to the Jetson Xavier NX via a micro-USB cable, download all of the necessary JetPack components using the SDK Manager, and then flash the JetPack to the target Jetson Xavier NX. This method allows you to directly flash the JetPack to the SD Card or to the NVME SSD drive on the race car Jetson. You may need to create an NVIDIA account to download the NVIDIA SDK manager.
Download and install SDK Manager on your host machine.
Follow the steps at Install Jetson Software with SDK Manager. Select JetPack version 5.1.1 (rev. 1). The target hardware will be the Jetson Xavier NX.
If you have trouble flashing the JetPack, you can put the Jetson into Force Recovery Mode by using a jumper to connect PINs #9 and #10 of the connector J50 before powering up the Jetson.
SD Card Image Method:
This method requires a computer with Internet connection and the ability to read and write SD cards
Download JetPack 5.1.1
If you have not previously run a JetPack 5.x release on your Jetson Xavier NX Developer kit, you must first update its QSPI before using this JetPack 5.x SD Card image. See the SD Card Image Method section for more information.
Follow the steps at Jetson Xavier NX Developer Kit - Get Started to write the Jetpack to the microSD card.
Insert your microSD card to the Jetson.
Once the JetPack is successfully flashed to the Jetson NX, boot the system and the Ubuntu desktop environment should launch
Install ROS2 galactic
(Approximate Time Investment: 0.5 hour)
Follow the ROS2 instructions to install ROS2 galactic
Set up Autoware development environment
(Approximate Time Investment: 0.5 hour)
Clone the galactic branch of autowarefoundation/autoware and move to the directory.
git clone -b galactic https://github.com/autowarefoundation/autoware.git
cd autoware
If you are installing Autoware for the first time, you can automatically install the dependencies by using the provided Ansible script.
./setup-dev-env.sh --no-nvidia --no-cuda-drivers

#The NVIDIA library and cuda driver installation are disabled as they are already installed with the JetPack. If you force the cuda driver installation here, it can mess up the kernel and cause errors at bootup. You will need to reflash the JetPack if this happens.
Under the autoware folder, go to the autoware.repos file and change the version of universe/autoware.universe from galactic to f1tenth_galactic
Set up Autoware workspace
(Approximate Time Investment: 6-7 hours)
Create the src directory and clone repositories into it.
autoware uses vcstool to construct workspaces.
cd autoware
mkdir src
vcs import src < autoware.repos
Install dependent ROS packages.
source /opt/ros/galactic/setup.bash
rosdep update --include-eol-distros
rosdep install -y --from-paths src --ignore-src --rosdistro $ROS_DISTRO -r

#Ignore the `Invalid version` errors during rosdep installation
Create swapfile. Originally from Autoware troubleshooting section
Building Autoware requires a lot of memory. Jetson NX can crash during a build because of insufficient memory. To avoid this problem, 16-32GB of swap should be configured.
Optional: Check the current swapfile
#Optional: Check current memory usage
free -h

#Remove the current swapfile
sudo swapoff /swapfile
sudo rm /swapfile`

#Create a new swapfile
sudo fallocate -l 32G /swapfile
sudo chmod 600 /swapfile
sudo mkswap /swapfile
sudo swapon /swapfile
```

#Optional: Check if the change is reflected
free -h
Build the workspace.
autoware uses colcon to build workspaces. For more advanced options, refer to the documentation.
colcon build --symlink-install --cmake-args -DCMAKE_BUILD_TYPE=Release
Ignore the stderr warnings during the build.
Install f1tenth_gym simulator dependencies
(Approximate Time Investment: 10 minutes)
Install onnx and roll back setuptools to version 65.5.0
pip3 install onnx setuptools==65.5.0
The f1tenth_gym_ros simulator is used in this case, click here for details.
cd autoware/src/universe/autoware.universe/f1tenth/f1tenth_gym_ros/f1tenth_gym
pip3 install -e .
RoboRacer Recordreplay Demo
This demo allows the user to first build a map, record a trajectory by manually driving the RoboRacer race car, and then perform trajectory following in both the RoboRacer gym simulator and in `real-world`(testing in progress) running the Autoware framework.
How to create a map
This part assumes that you have a fully built and properly tuned RoboRacer car. For instructions on how to configure an RoboRacer car, see f1tenth_system.
On your RoboRacer car, install the slamtoolbox
sudo apt install ros-galactic-slam-toolbox
Start the f1tenth system
Terminal 1
source /opt/ros/galactic/setup.bash
cd autoware && . install/setup.bash
ros2 launch f1tenth_stack bringup_launch.py
Start the slamtoolbox
Terminal 2
source /opt/ros/galactic/setup.bash
cd autoware && . install/setup.bash
ros2 launch slam_toolbox online_async_launch.py slam_params_file:=/home/autoware/src/universe/autoware.universe/f1tenth/f1tenth_system/f1tenth_stack/config/f1tenth_online_async.yaml
Launch RViz2, Add /map by topic. Add /graph_visualization by topic. On the top left corner of rviz, panels – add new panel – add SlamToolBoxPlugin panel. Once you’re done mapping, save the map using the plugin. You can give it a name in the text box next to Save Map. Map will be saved in whichever directory you run slam_toolbox.
Create a map without an RoboRacer race car
If you do not have an RoboRacer car, You can draw your own map and save as .png files. Make sure you set the corresponding .yaml file correctly. You can also use the map provided in the RoboRacer simulation folder under /map directory.
Change map in the RoboRacer simulator
Navigate to /home/autoware-f1/autoware/install/f1tenth_gym_ros/share/f1tenth_gym_ros/config. In sim.yaml, update the map file path.
How to record a trajectory (simulation)
Use the demo_launch launch file to launch gym_bridge, recordreplay_planner, and trajectory_follower_f1tenth nodes.
Terminal 1
source /opt/ros/galactic/setup.bash
cd autoware && . install/setup.bash
ros2 launch launch_autoware_f1tenth demo_launch.py
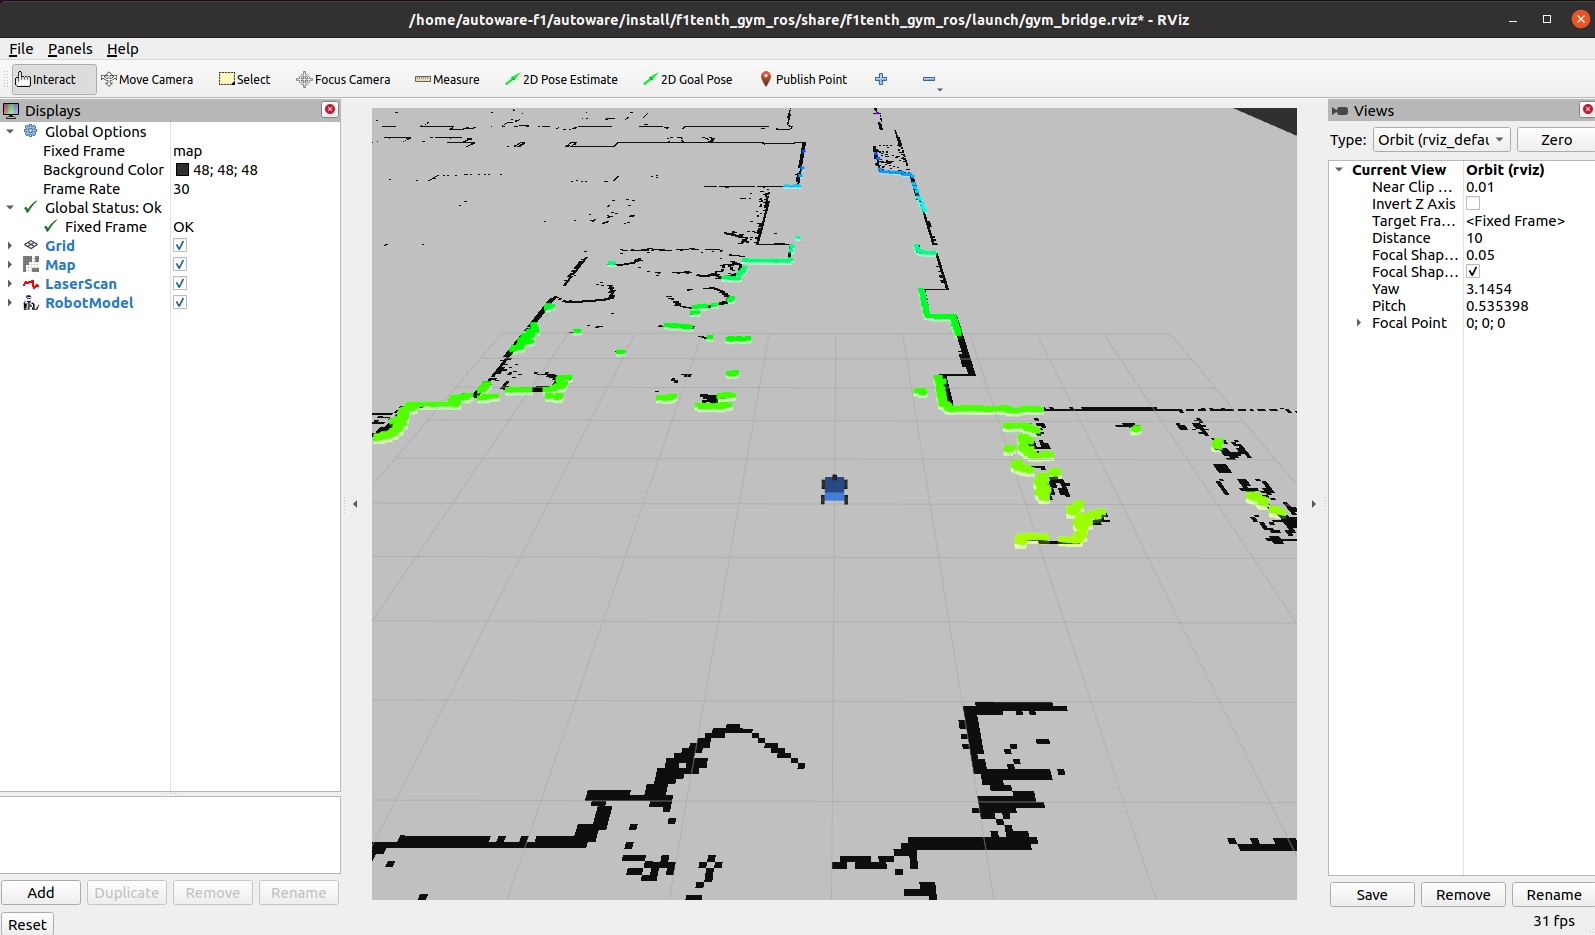
Rviz2 should launch automatically with the target map loaded (black markers). After a short peroid of time the simulated Lidar data (colored markers) should be overlaid on top of the map indicating the simulator is running correctly. It can take up to 5 minutes for the Lidar data to show up if the simulator is launched the first time. You may use your mouse’s left/right buttons and scroll wheel in RViz2 to zoom-out and adjust the camera angle to top-down view.
Launch the teleop_twist_keyboard node for keyboard tele-operation. Focus on (select) this terminal and use U, I, O keys to manually control the RoboRacer car in the simulation. Use Q and Z keys to increase and decrease the speed.
Terminal 2
source /opt/ros/galactic/setup.bash
cd autoware && . install/setup.bash
ros2 run teleop_twist_keyboard teleop_twist_keyboard
3. Record a trajectory and save at your preferred path. To stop recording, Ctrl + C and your path will be automatically saved. The default path for the recording is set to “/tmp/path”. This recording will be automatically erased after system reboot.
Terminal 3
source /opt/ros/galactic/setup.bash
cd autoware && . install/setup.bash
ros2 action send_goal /planning/recordtrajectory autoware_auto_planning_msgs/action/RecordTrajectory "{record_path: "/tmp/path"}" --feedback
How to replay a trajectory (simulation)
Use the demo_launch launch file to launch gym_bridge, recordreplay_planner, and trajectory_follower_f1tenth nodes if they are not currently running.
Terminal 1
source /opt/ros/galactic/setup.bash
cd autoware && . install/setup.bash
ros2 launch launch_autoware_f1tenth demo_launch.py
Replay a trajectory from your previously saved file. You can use the 2D Pose Estimate tool in RViz2 anytime to reset the car’s pose.
Terminal 2
source /opt/ros/galactic/setup.bash
cd autoware && . install/setup.bash
ros2 action send_goal /planning/replaytrajectory autoware_auto_planning_msgs/action/ReplayTrajectory "{replay_path: "/tmp/path"}" --feedback
How to record a trajectory (real car)
Use the realcar_launch launch file to launch the f1tenth_stack, recordreplay_planner, and trajectory_follower_f1tenth nodes.
Terminal 1
source /opt/ros/galactic/setup.bash
cd autoware && . install/setup.bash
ros2 launch launch_autoware_f1tenth realcar_launch.py
Launch the particle_filter node for localization. You need the library range_libc to utilize the GPU. For instructions on setup, see particle_filter.
Terminal 2
source /opt/ros/galactic/setup.bash
cd autoware && . install/setup.bash
ros2 launch particle_filter localize_launch.py
3. Record a trajectory and save at your preferred path. To stop recording, Ctrl + C and your path will be automatically saved. The default path for the recording is is set to “/tmp/path”. This recording will be automatically erased after system reboot.
source /opt/ros/galactic/setup.bash
cd autoware && . install/setup.bash
ros2 action send_goal /planning/recordtrajectory autoware_auto_planning_msgs/action/RecordTrajectory "{record_path: "/tmp/path"}" --feedback
How to replay a trajectory (real car)
Use the realcar_launch launch file to launch f1tenth_stack, recordreplay_planner, and trajectory_follower_f1tenth nodes.
Terminal 1
source /opt/ros/galactic/setup.bash
cd autoware && . install/setup.bash
ros2 launch launch_autoware_f1tenth realcar_launch.py
Launch the particle_filter node for localization. You need the library range_libc to utilize the GPU. For instructions on setup, see particle_filter.
Terminal 2
source /opt/ros/galactic/setup.bash
cd autoware && . install/setup.bash
ros2 launch particle_filter localize_launch.py
Replay a trajectory from your previously saved file
Terminal 3
source /opt/ros/galactic/setup.bash
cd autoware && . install/setup.bash
ros2 action send_goal /planning/replaytrajectory autoware_auto_planning_msgs/action/ReplayTrajectory "{replay_path: "/tmp/path"}" --feedback
Troubleshooting/Tips
If editing files doesn’t seem to change anything, delete the respective package files in the install and build folders under autoware and rebuild the respective package using –packages-select again.
You may need to insert a hdmi emulator to the Jetson for NoMachine to initiate remote desktop when running on a real RoboRacer car. Sometimes you will need to put the emulator in and out a few times for NoMachine to start remote desktop.