Configuring and Connecting to the NVIDIA Jetson NX
Equipment Used:
Pit/Host laptop/computer (a host PC running Ubuntu is required to flash the Jetson)
Fully-built RoboRacer vehicle
External monitor/display
HDMI cable
Keyboard
Mouse
Wireless router
Approximate Time Investment: 2-3 hours
Overview
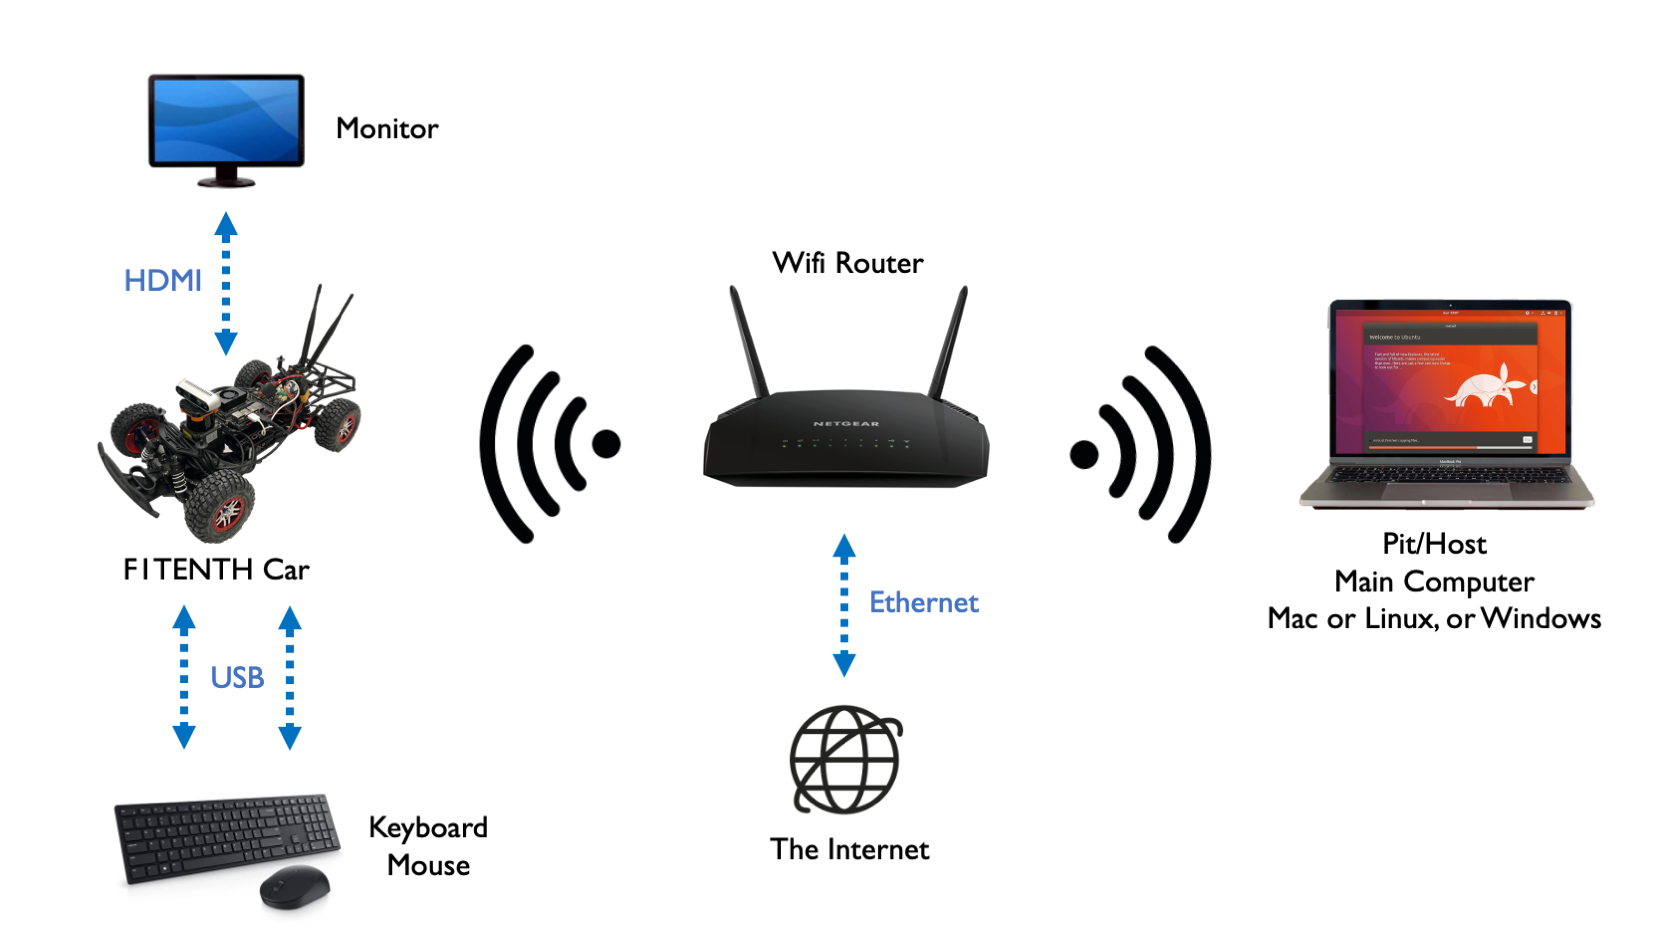
We could log into the Jetson using a monitor, keyboard, and mouse, but ideally we want remote access while we’re driving the car. In this section you’ll flash the Jetson, connect it and your Pit/Host laptop to the same wireless network, and set up SSH and remote desktop access. Make sure to get the network settings right! Using the wrong IP address may lead to conflicts with another classmate, meaning neither of you will be able to connect.
If your Pit/Host computer has WiFi capability, connect both the computer and the RoboRacer car to a wireless router which reserves a static IP address for the Jetson NX on the vehicle.
If the Pit/Host computer doesn’t have WiFi capability:
Connect the Pit/Host computer to a WiFi router via an ethernet cable.
Connect the NVIDIA Jetson NX to the same router via WiFi.
To make this section easy to follow, the router’s WiFi network SSID will be referred to as F1TENTH_WIFI. In your scenario, it’ll be the SSID of your router’s access point.
1. Flash the Jetson NX with the NVIDIA SDK Manager
Flashing the Jetson and installing the NVIDIA JetPack software is handled by the NVIDIA SDK Manager. Rather than burning an SD card image by hand, follow NVIDIA’s official guide and use Option 2 - NVIDIA SDK Manager to flash your Jetson:
NVIDIA SDK Manager flashing guide
Once flashing is complete, boot the Jetson with a monitor, keyboard, and mouse connected, and complete the initial Ubuntu setup (language, keyboard layout, time zone, and the f1tenth user account).
Important
The barrel jack on the powerboard is only rated for 9.0V - 16.0V. The power supplies that come with the Jetson NX are 19V and therefore have a higher voltage. Do not plug those in. Otherwise you will destroy your powerboard.
2. Vehicle Hardware Setup
If you have an NVIDIA Jetson NX, it comes with a network card onboard. Make sure the antennas are connected. The battery should be plugged into the vehicle and the Powerboard should be on.
If you have an NVIDIA Jetson Nano or a Xavier, you’ll need to install an additional M.2 network card from Intel to enable wireless networking.
3. Connecting to WiFi and SSH
Power up the RoboRacer vehicle and connect the car to a monitor (via HDMI) and both a mouse and keyboard (via USB). The Jetson NX will boot to its Ubuntu Desktop.
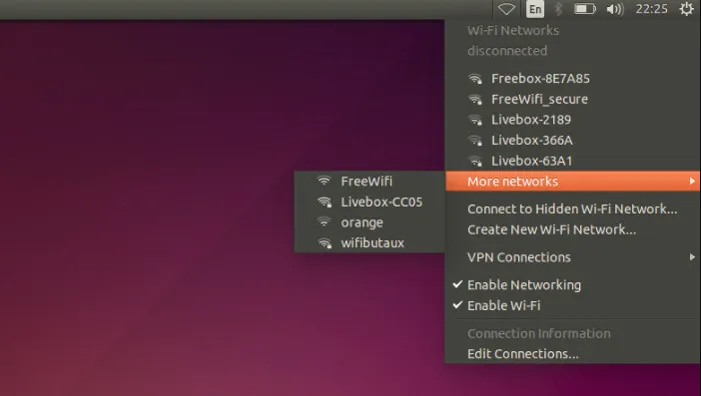
To connect the NVIDIA Jetson NX to WiFi, click the wireless icon in the top-right corner of the Ubuntu Desktop and select your network (F1TENTH_WIFI). It might take a while for the NVIDIA Jetson NX to discover the wireless network.
After you’re connected to the wireless network, open a terminal and type:
ifconfig
You should be able to find your car’s assigned IP address under wlan0, after inet.
Next, connect your Pit/Host laptop to the same wireless network, F1TENTH_WIFI, and find its IP address. On Linux or macOS you can use the same ifconfig command (on macOS it may be under en0 or en1). If you’re running Linux on the Pit laptop in a virtual machine (VM), you may need to set its network adapter to NAT mode so the VM shares the host’s wireless connection instead of controlling the adapter itself.
Now that the car and the laptop are on the same network, check that they can reach each other:
ping [PIT_IP] (the IP address of the Pit computer).ping [JETSON_IP] (the IP address of the NVIDIA Jetson NX).Remember to replace the IP addresses above with your specific addresses.
You can now SSH into the car from your laptop:
ssh f1tenth@[IP_ADDRESS]
where [IP_ADDRESS] is the Jetson’s WiFi IP address that you found above. Use ssh directly if you’re on macOS or Linux, or use PuTTY if you’re on Windows.
We recommend using tmux while you’re ssh-ed into the car. That way you can close the terminal and your code on the car keeps running, since the SSH session is only paused. You’ll need to install tmux on the respective system you are using.
4. Updating Packages
All further steps assume that your NVIDIA Jetson Xavier NX Developer Kit is connected to the internet. You can execute all the commands directly in the terminal application of the NVIDIA Jetson. Now we are updating the Ubuntu system on the Jetson NX.
To update the list of available packages, run
sudo apt update.To install all available updates, run
sudo apt full-upgrade.Once all packages have been upgraded run
sudo rebootto restart the Developer Kit and apply any changes.
5. Creating a Swapfile
Run the following commands to create a swapfile which can help with memory-intensive tasks
sudo fallocate -l 4G /var/swapfile
sudo chmod 600 /var/swapfile
sudo mkswap /var/swapfile
sudo swapon /var/swapfile
sudo bash -c 'echo "/var/swapfile swap swap defaults 0 0" >> /etc/fstab'
6. Install the Logitech F710 driver on the Jetson.
git clone https://github.com/jetsonhacks/logitech-f710-module
cd logitech-f710-module
./install-module.sh
7. Using a Remote Desktop
Although we now have SSH access to the car, it is still inconvenient to run GUI applications on the car remotely. In this section, we’ll go over how to set up a remote desktop so you can easily use GUI applications like rviz. In our example, we’ll use NoMachine. If you’re an advanced user and can find another remote desktop solution that works on the car, feel free to use it.
First, download NoMachine for your pit/host computer’s specific OS here. Then, while your Jetson is still connected to the monitor, install NoMachine following this guide here. Note that the guide uses Jetson Nano, the same applies to Jetson Xavier NX. You only have to follow the Install NoMachine section and don’t have to set up an alternative desktop environment.
After NoMachine is installed on both sides, go to your pit/host’s NoMachine, click Add to configure your connection and insert the IP address of the Jetson. You’ll only need to change the Host field. Click connect to connect to the Jetson. You’ll then be prompted for the Jetson’s username and password to log in. Now you should have remote desktop access to the Jetson.