2. RoboRacer Driver Stack Setup
- Equipment Required:
Fully built RoboRacer vehicle
Pit/Host computer OR
External monitor/display, HDMI cable, keyboard, mouse
Approximate Time Investment: 1.5 hour
Warning
Before you proceed, this section sets up the driver stack natively for Jetson Xavier and above running JetPack 5.0 or newer (Ubuntu 20.04+) with ROS 2. For JetPack versions below 5.0 and Jetsons before Xavier, go to Driver Stack Setup with Docker Containers and follow the instructions there instead.
Overview
We use ROS 2 Humble for communication and to run the car. You can find a tutorial on ROS 2 here.
In this section you’ll install ROS 2 Humble and its utilities, set up udev rules for the sensors, install and build the F1TENTH driver stack, and configure your LiDAR.
Everything in this section is done on the Jetson NX, so you’ll need to connect to it via SSH from the Pit laptop or plug in the monitor, keyboard, and mouse.
1. Installing ROS 2 Humble
Follow the official ROS 2 Humble installation guide to install ROS 2 from Debian packages:
ROS 2 Humble — Ubuntu (Debian packages) Installation
When you reach the install step, install the ROS-Base Install (Bare Bones) — this provides the communication libraries, message packages, and command-line tools, with no GUI tools:
sudo apt install ros-humble-ros-base
2. Installing rosdep
rosdep is the dependency-resolution tool we’ll use to install the driver stack’s dependencies. Install and initialize it by following the official guide:
3. udev Rules Setup
When you connect the VESC and a USB LiDAR to the Jetson, the operating system will assign them device names of the form /dev/ttyACMx, where x is a number that depends on the order in which they were plugged in. For example, if you plug in the LiDAR before the VESC, the LiDAR will be assigned /dev/ttyACM0 and the VESC /dev/ttyACM1. This is a problem, as the car’s configuration needs to know which device name belongs to which device, and these can change every time you reboot depending on the initialization order.
Fortunately, Linux has a utility named udev that lets us assign each device a “virtual” name based on its vendor and product IDs. We will use udev to assign persistent device names to the LiDAR, VESC, and joypad by creating configuration files (“rules”) in the directory /etc/udev/rules.d.
Tip
These rule files have to be created as root with a text editor. If you don’t already have a terminal editor you’re comfortable with, install nano and use it to open and edit each file — it’s the easiest option:
sudo apt install nano
Then open any file below with sudo nano <filename> (for example sudo nano /etc/udev/rules.d/99-vesc.rules), paste the rule, and save with Ctrl+O then exit with Ctrl+X.
Hokuyo LiDAR rule (skip this first rule if you are not using a Hokuyo USB LiDAR — e.g. if you’re using an ethernet SICK LiDAR).
Open /etc/udev/rules.d/99-hokuyo.rules and copy in the following rule exactly as it appears below, on a single line, then save it:
KERNEL=="ttyACM[0-9]*", ACTION=="add", ATTRS{idVendor}=="15d1", MODE="0666", GROUP="dialout", SYMLINK+="sensors/hokuyo"
Next, open /etc/udev/rules.d/99-vesc.rules and copy in the following rule for the VESC:
KERNEL=="ttyACM[0-9]*", ACTION=="add", ATTRS{idVendor}=="0483", ATTRS{idProduct}=="5740", MODE="0666", GROUP="dialout", SYMLINK+="sensors/vesc"
Then open /etc/udev/rules.d/99-joypad-f710.rules and add this rule for the joypad:
KERNEL=="js[0-9]*", ACTION=="add", ATTRS{idVendor}=="046d", ATTRS{idProduct}=="c219", SYMLINK+="input/joypad-f710"
Note
The Logitech F710 has a D/X switch on the back. The rule above uses the DirectInput (D) product ID c219. If your joypad enumerates with product ID c21f instead, it is in XInput (X) mode — either flip the switch to D, or replace c219 with c21f in the rule above. Run lsusb (look for the Logitech entry) to confirm which product ID your joypad reports.
Finally, trigger (activate) the rules by running:
sudo udevadm control --reload-rules
sudo udevadm trigger
Reboot your system, and you should find the new devices by running:
ls /dev/sensors
ls /dev/input
If you want to add additional devices and don’t know their vendor or product IDs, you can use the command:
sudo udevadm info --name=<your_device_name> --attribute-walk
making sure to replace <your_device_name> with the name of your device (e.g. ttyACM0 if that’s what the OS assigned it — the Unix utility dmesg can help you find that). The topmost entry will be the entry for your device; lower entries are for the device’s parents.
4. Installing the F1TENTH Driver Stack
First, source ROS 2 so that colcon and the other build tools are available (do this in every new terminal, or add it to your ~/.bashrc):
source /opt/ros/humble/setup.bash
Create a ROS workspace:
cd $HOME && mkdir -p f1tenth_ws/src
Clone the F1TENTH stack repo from the humble-devel branch:
cd f1tenth_ws/src
git clone --branch humble-devel https://github.com/f1tenth/f1tenth_system.git
Update the git submodules to pull in all the necessary packages:
cd f1tenth_system
git submodule update --init --recursive --remote
Install the dependencies with rosdep:
cd $HOME/f1tenth_ws
rosdep update --include-eol --rosdistro=humble
rosdep install --include-eol --from-paths src -i -y --rosdistro=humble
Build the workspace:
colcon build
Note
If you get a CMake error about asio_cmake_module being missing while building the vesc_driver package, install it and build again:
sudo apt install ros-humble-asio-cmake-module
colcon build
You can find more details on how the drivers are set up in the README of the f1tenth_system repo.
5. Setting Up Your LiDAR
The driver stack supports different LiDARs. Follow the option that matches your hardware.
Option 1 — Hokuyo LiDAR
If you are using a USB Hokuyo (e.g. the 30LX), no extra setup is needed — it is referenced through the udev rule you created in the udev Rules Setup section above.
If you have a Hokuyo 10LX that connects over ethernet, you’ll need to configure the eth0 network. From the factory, the 10LX is assigned the IP 192.168.0.10 (note that the LiDAR is on subnet 0).
Open Network Configuration in the Linux GUI on the Jetson NX. In the IPv4 tab, add a connection so that the eth0 port is assigned:
IP address
192.168.0.15Subnet mask
255.255.255.0Gateway
192.168.0.10
Name the connection Hokuyo, save it, and close the network configuration GUI. When you plug in the 10LX, make sure the Hokuyo connection is selected. If everything is configured properly, you should now be able to ping 192.168.0.10.

Option 2 — SICK ethernet LiDAR
If you are using a SICK ethernet LiDAR (e.g. a SICK TiM), follow these steps.
Install the SICK LiDAR driver:
sudo apt install ros-humble-sick-scan-xd
Configure the Jetson’s wired (ethernet) connection so it is on the same subnet as the LiDAR. Open the network settings, edit the Wired connection’s IPv4 tab, set the method to Manual, and add an address:
Address:
192.168.0.15Netmask:
255.255.255.0Gateway: leave blank (no gateway is required for a direct connection)
The address just needs to be on the 192.168.0.x subnet and different from the LiDAR’s address. Click Apply.
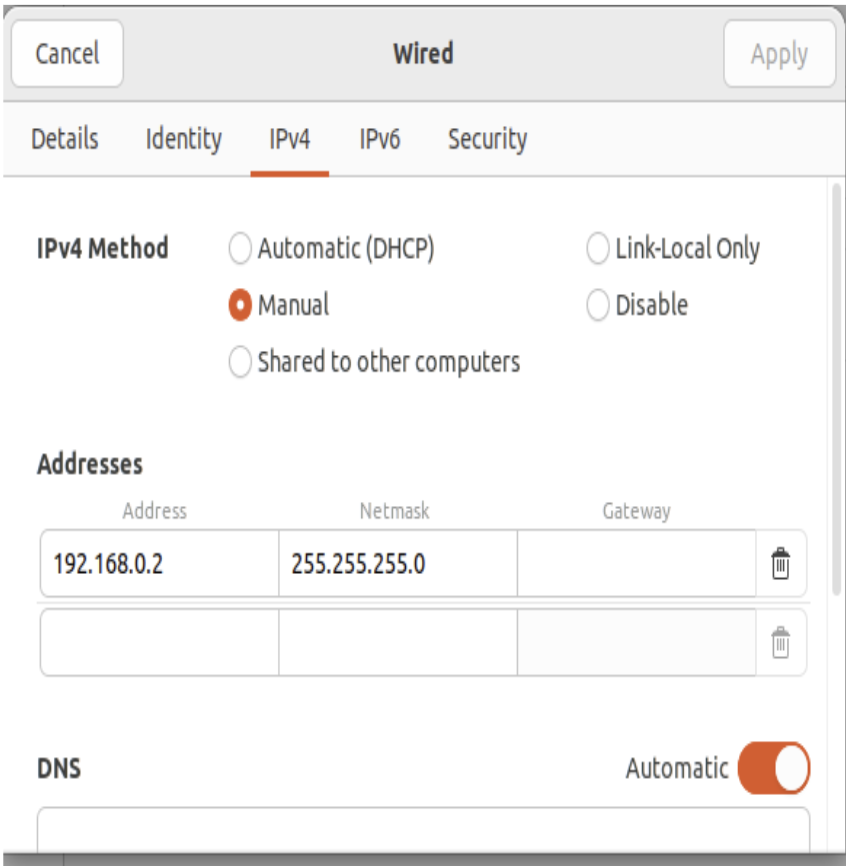
Setting a static IPv4 address for the wired connection to the SICK LiDAR.
Find the LiDAR’s IP address. SICK LiDARs ship with a factory IP on the
192.168.0.xsubnet. Scan the subnet to discover which address it’s using:
sudo nmap -sn 192.168.0.0/24
Point the launch files at your LiDAR’s IP address. Both files are in:
/home/nvidia/f1tenth_ws/src/f1tenth_system/f1tenth_stack/launch/
Open sick_tim_5xx.launch, go to line 22, and set the hostname to your LiDAR’s IP address:
<arg name="hostname" default="X.X.X.X"/>
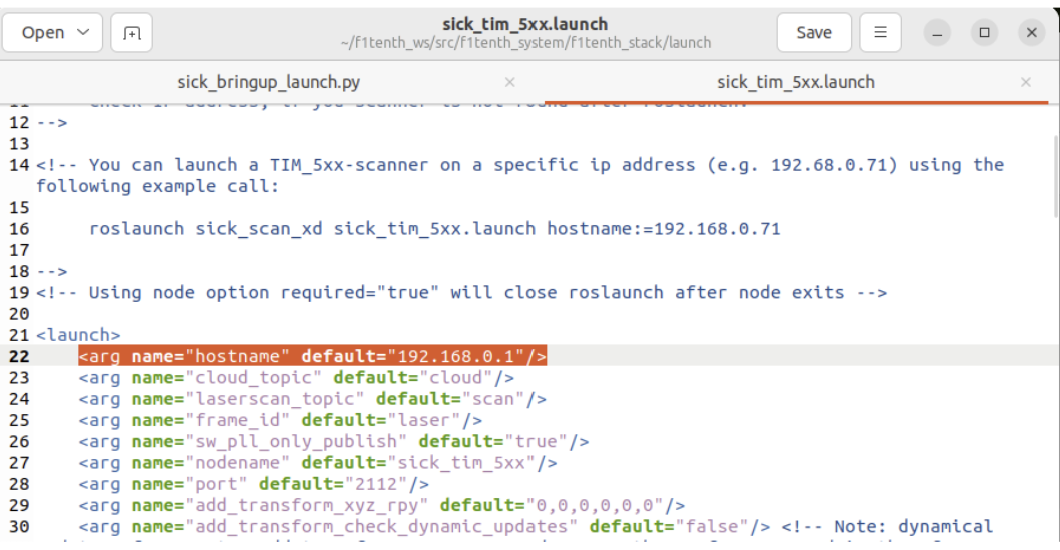
Setting the LiDAR IP in sick_tim_5xx.launch.
Then open sick_bringup_launch.py, go to line 114, and set the arguments path so it points at your sick_tim_5xx.launch file:
arguments=["/home/nvidia/f1tenth_ws/src/f1tenth_system/f1tenth_stack/launch/sick_tim_5xx.launch"]
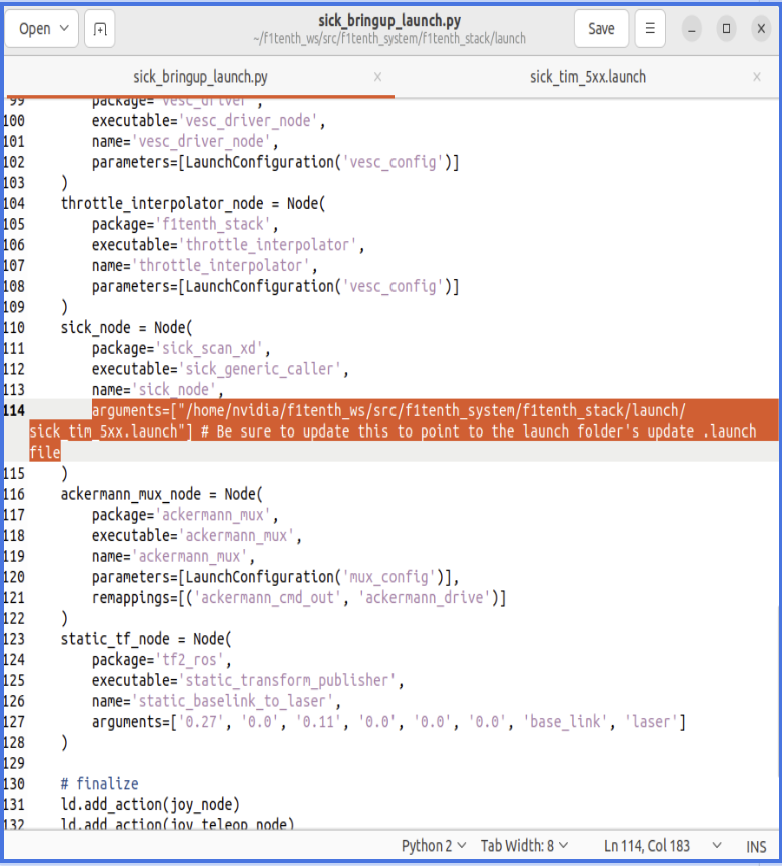
Pointing sick_bringup_launch.py at the SICK launch file.
Note
The exact line numbers (22 and 114) may shift slightly if the files have been updated — look for the hostname argument in sick_tim_5xx.launch and the arguments=[...] entry of the sick_node in sick_bringup_launch.py.
6. Launching the Driver Stack
Once your LiDAR is configured, source the ROS 2 underlay and your workspace’s overlay, then launch the bringup:
source /opt/ros/humble/setup.bash
cd $HOME/f1tenth_ws
source install/setup.bash
ros2 launch f1tenth_stack bringup_launch.py
Running the bringup launch will start the VESC drivers, the LiDAR drivers, the joystick drivers, and all necessary packages for running the car. To see the LaserScan messages, open a new terminal and run:
source /opt/ros/humble/setup.bash
cd $HOME/f1tenth_ws
source install/setup.bash
rviz2
The rviz window should show up. Add a LaserScan visualization on the /scan topic to see your LiDAR data.